How to Use Your Luna G3 CPAP Device
This box includes all the necessary components for your Positive Airway Pressure (PAP) therapy. To begin, remove the carrying case from the pack. Inside, you'll find: Your PAP device Power supply Tubing Extra filter Mask User manual Keep the manual in a secure place for future reference. Now, let's set up the device: Connect one
This box includes all the necessary components for your Positive Airway Pressure (PAP) therapy. To begin, remove the carrying case from the pack. Inside, you’ll find:
- Your PAP device
- Power supply
- Tubing
- Extra filter
- Mask
- User manual
Keep the manual in a secure place for future reference. Now, let’s set up the device:
- Connect one end of the tubing to the mask.
- Connect the other end to the air outlet of the device.
- If using heated tubing, attach the joint to the air outlet before plugging in the power supply.
- That’s it! You’re ready to start using your PAP therapy.
To complete the setup of your Positive Airway Pressure (PAP) device, follow these steps:

Connect the heated tubing to the hectic tubing port on the back of the device.
Attach the power cord to the power adapter, then connect the adapter to the DC Inlet on the primary device.
Plug the power cord into a power outlet and place the device on a stable, flat surface near your bed.
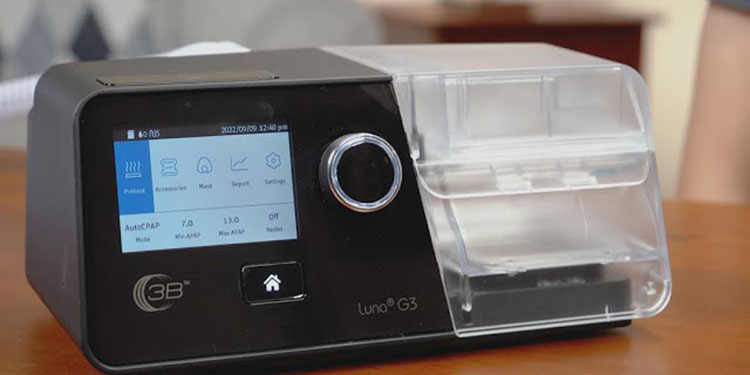
Now that your PAP device is ready let’s take a closer look at its features:
The filter is on the back of the device, with a filter already in place. Place your thumb on the door tab to access it and pull it down. To close, line up the door with the device, and it will snap back into place.
On the right side of the front of the device is the humidifier. To remove the humidifier chamber, push down on it, and it will pop up. Lift the tab in front of the room to open it and fill it with water.
With these simple steps, you’re on your way to better sleep with your PAP therapy.
Use distilled water only as a top-up or drinking water, as mineral deposits in other types of water can harm your device. Ensure not to exceed the fill line when filling the water chamber. Avoid traveling with water in the room, as this can cause water to enter the machine, resulting in damage. Once filled, close the lid and securely insert the chamber into the device.
To adjust the humidifier settings, push the knob when the humidifier tab is selected and turn the knob to the desired location. It can be off the auto or a number between one and five. If there’s no water in the humidifier, set it to off. Push the knob to confirm the setting. In the morning, a few water droplets in the tubing indicate that the humidifier is functioning correctly.
Adjust the humidifier appropriately. If there’s excessive condensation in the tubing or mask, the humidifier setting is too high and should be reduced. Conversely, if you experience nasal dryness, it means the humidifier setting is too low.
The button on top of the PAP machine is the power button, which turns the machine on and off. On the front of the device, beneath the screen, is the home button, while the knob is located to the right of the screen.
Press the home button to access the patient menu when the machine is off. In the patient menu, the first icon is the preheat option. Press the knob while this icon is highlighted to start preheating the water chamber for up to 30 minutes before therapy. Press the home button at any time to return to the patient menu. The next icon is the accessories icon.
Press the knob to access the accessories menu. This menu shows the days you’ve used the filter, tubing, or mask. Remember to update the dates when replacing them.
The next icon in the patient menu is the mask icon, which allows you to select your mask type and run a mask fit test to determine if the mask is correctly fitted.
The report icon in the patient menu provides data usage and AHI information over various time frames: one day, 7 days, 30 days, 90 days, 182 days, or 365 days. This menu also offers QR or iCodes to upload the data to the system.
The last icon in the patient menu is the settings icon, which lets you modify the humidifier settings, screen brightness, date and time, and language.
At the bottom of the patient menu, you’ll find information on your PAP machine settings.
The PAP machine has several therapy modes, including CPAP or Auto-PAP. The pressure settings and Reslex settings can be adjusted. The Reslex location is a comfort feature that reduces pressure during exhalation.
You can also adjust the humidifier setting while the machine is in use by rotating the knob to the humidifier setting, then pressing the knob to change the location to your desired level. The ramp time, which determines the time it takes for the pressure to reach the prescribed level, can also be adjusted by scrolling to the ramp icon and choosing from off, auto, or a time between 5 to 30 minutes.
The last icon in the patient menu is the settings icon, which allows you to change other settings while the machine is in use. With the device set up, it’s time to start using it in your daily routine.
And dry the chamber thoroughly. To ensure the longevity and effectiveness of your therapy, it is also recommended to replace the filter and mask regularly. To make the most out of your treatment and ensure a comfortable sleep, it is essential to establish a routine and follow it regularly. Your sleep coach will contact you every few weeks to monitor your progress and address any concerns. By keeping your equipment clean and well-maintained, you will enjoy the benefits of your therapy for a long time.
Suppose you notice a lot of condensed water droplets inside the tubing or mask. In that case, the humidifier level is set too high and needs to be adjusted lower. On the other hand, nasal dryness indicates that the humidifier level is too low. The power button on top of the machine turns it on and off. The home button is under the screen, and the knob to the right can be pressed when the device is off to access the patient menu.
In the patient menu, the first icon is for the preheat option. Clicking the knob while on this icon will heat the water chamber for up to 30 minutes before therapy. The accessories icon lets you view how many days you have used the filter, tubing, or mask and reset the dates when changed. The mask icon allows you to select your mask type and run a fit test. The report icon displays your data usage and AHI over 1, 7, 30, 90, 182, or 365 days. It provides a QR code for uploading to the system. The settings icon in the patient menu allows you to adjust settings such as humidifier, brightness, date, time, and language. The bottom of the patient menu displays your machine settings, including therapy mode (CPAP or Auto), pressure, and Reslex (a comfort setting that reduces stress during exhalation).
It takes time to use the machine regularly, but this will significantly improve your sleep quality. It’s essential to establish a routine for cleaning the equipment, such as wiping the mask daily, emptying and rinsing the humidifier chamber, and washing the foam filter every two weeks. And cleaning the humidifier chamber and tubing once a week. Don’t leave standing water in the humidifier chamber to avoid bacteria growth.
In conclusion, you can easily set up and use your Luna G3 CPAP device with a few simple steps. The device features a filter, humidifier, power button, home button, knob, patient menu, and therapy modes. You can adjust the humidifier, pressure settings, ramp time, and more to ensure maximum comfort during your PAP therapy. Keep the user manual handy for future reference, and replace the filter, tubing, and mask as needed. With these tools and resources, you’re well on your way to a better night’s sleep.
Related Posts
How to Adjust Clinical Settings – AirSense 11 CPAP
Hello, I want to discuss the clinical or provider menu introduced in the past year. Please note that if you are not a clinician or not under the supervision of one. I highly advise you not to modify this menu, which can lead to unintended consequences. The menu includes options for settings and modes related
Top 3 Home CPAP Machine Brands for Better Sleep in 2025
Discover the top 3 home CPAP machine brands in 2025: ResMed, Philips Respironics, and Nuanran Meitai. Learn about their key features, benefits, and why they are leading the market in sleep apnea treatment and sleep quality improvement.
The Best Way to Clean Your Home CPAP Machine
When a home CPAP machine is used for a long time, it needs to be cleaned regularly to keep it clean and free from contamination. Properly cleaning a ventilator can effectively prevent the growth and spread of bacteria while ensuring you breathe cleaner air. Next, BreatheHelp looks at the best way to clean your CPAP
Notice: Internet users spontaneously contributed the article content, and the article views only represent the author himself. This site only provides storage services, does not have ownership, and bears relevant legal liabilities. If you find plagiarism, infringement, or illegal content, please contact the administrator to delete it.